Intravenous Piggyback (IVPB) Medication Administration
Intravenous Piggyback (IVPB) Medication Administration
Course Description
IV Piggyback Medication Administration: This online course discusses guidelines and techniques in proper IV piggyback setup including back priming, bag and equipment set up, and other important steps of the piggyback infusion procedure.
Accreditation Information: KLA Education Services LLC is accredited by the State of California Board of Registered Nursing, Provider # CEP16145.
Course Certification: Once you have completed this course, click on the “Print Certificate” option below to save or print your CE course certification. If you are not yet registered in a course plan with IvyLeagueNurse, please complete the registration and payment process so that you are able to log into your account and fully obtain your course certificate. Our affordable and unlimited one-year CEU plan starts at just $19.99.
Print Certificate Print Course
Course Objectives
Upon completion of this course, the course participant will be able to:
- Explain the rationale for the use of IVPB.
- Explain the importance of using secondary tubing.
- Describe the equipment used in an IV piggyback setup.
- Explain the procedure of hanging an IV piggyback.
- Understand intermittent use of IVPB .
- Describe Back Priming & Back Flushing.
- Describe proper labeling of fluid bags and tubing.
- Discuss IV fluid compatibility.
Course Content
Section 1: What is an IVPB?
-
IVPB is a method of medication administration commonly used for medical treatments, especially antibiotics.
-
In an IV piggyback setup, small volumes of intravenous solution are given by intermittent infusion.
-
Medication is administered via secondary IV tubing connected to the primary tubing.
-
Solutions used in intermittent infusion are typically prepared in the pharmacy before administration.
-
Medication is administered and the full IVPB setup is always performed by a trained nurse.
Section 2: Why Do We Want to Use an IVPB Setup?
-
It is important to administer many medications slowly via a secondary line to ensure the complete delivery of the prescribed dosage of an IVPB.
-
If abx are infused through the primary line only, then nurses cannot administer a flush. Without flushing the line, part of the abx dose stays in the tubing. However, when the IVPB is connected to a primary line(,) it allows the nurse to fully flush out the meds from the line.

Section 3: Anatomy of an IVPB System
A full IV piggyback setup with secondary tubing connected to primary tubing and secondary container positioned higher than the primary container to ensure proper and complete medication administration.
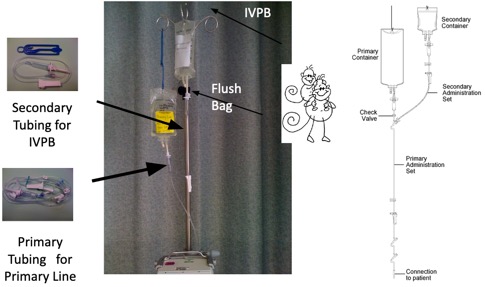
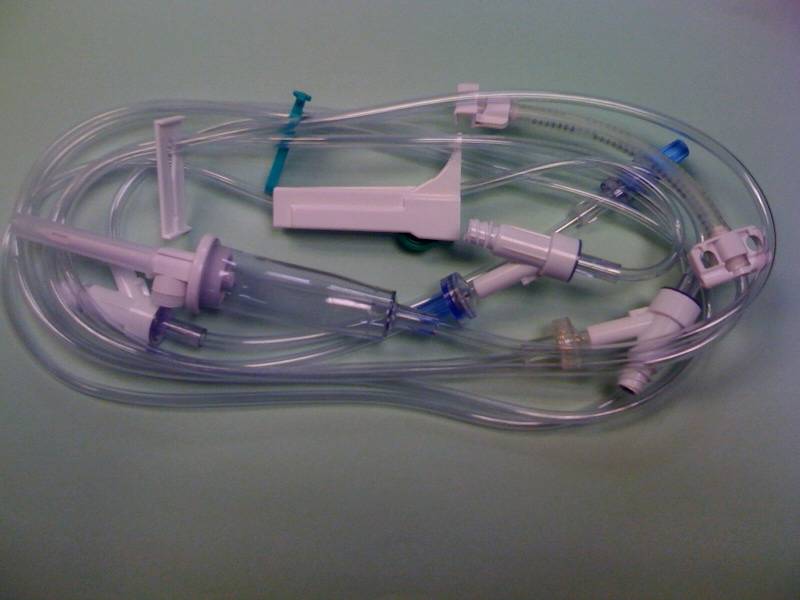
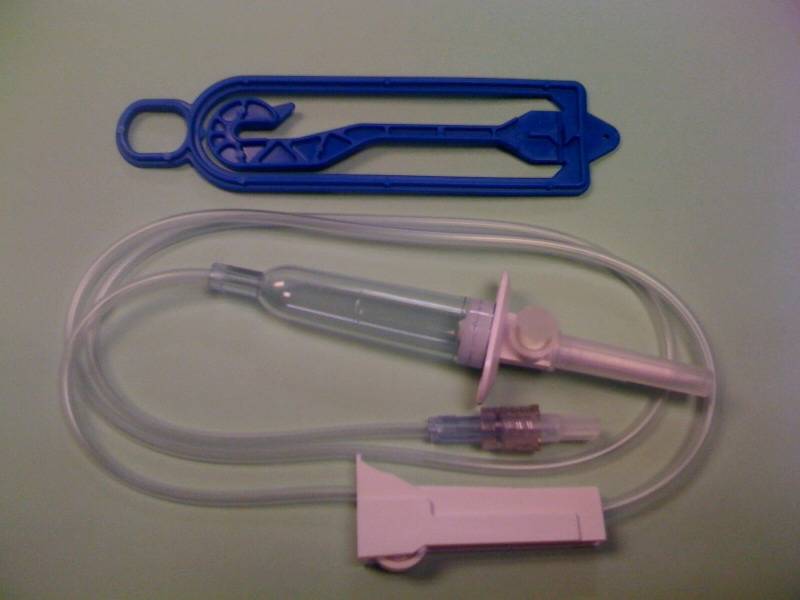
Section 4: Equipment Needed for Setting Up an IVPB System

Section 5: How to Start an IV Piggyback: Procedure for Hanging IVPBs
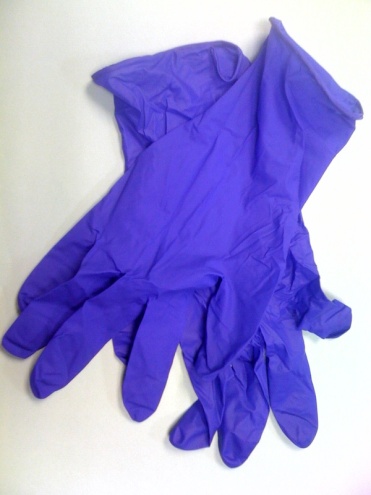
- Wash hands and don clean gloves
- Scan IVPB according to BCMA policy and procedures.
- Explain IVPB procedure to patient.
- Check the “Five Rights” of proper medication administration.
- Inspect IVPB solution for integrity, discoloration, turbidity, and particulates. Be sure to check the expiration date.
- Assess pt’s IV site/CVC for patency.
- To ensure patency of a CVC, observe brisk blood return. Take a syringe and aspirate until you see a brisk flow of blood fill catheter tubing.
- Aseptically spike the solution port of the IVPB with the 2° tubing.
- Ensure that the roller clamp is closed below the fluid chamber!
- Before connecting the 2° tubing to the 1° line, scrub the injection port above the pump with an alcohol prep pad for at least 15 seconds. Remember the phrase, “Scrub the Hub!”
Section 6: How to Back Prime an IV Piggyback
1. Lower down the secondary set to let fluid flow into it from the primary set.
- This step works based on the concept of gravity.
- It also helps remove air from secondary tubing.
2. Release the roller clamp to allow 1° solution to fill 2° tubing (don’t overfill fluid chamber).
3. Clamp off the 2° tubing once the fluid chamber is half-filled.
4. Squeeze any excessive fluid from the fluid chamber into the IV piggyback unit.
Section 7: Back Flushing Diagram
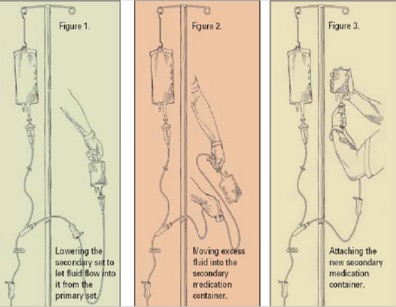
Figure 1: Lowering the secondary set to let fluid flow into it from the primary set.
Figure 2: Moving excess fluid into the secondary medication container.
Figure 3: Attaching the new secondary medication container.
Section 7(a): Back Flushing Using the Same Secondary Tubing
-
This back flushing method is used between doses and the existing secondary IVPB tubing is utilized here (not new tubing)
-
Lower down the 2° line with the IVPB
-
Allow for 1° solution to back fill the 2° tubing thoroughly draining into old med bag.
-
Don’t overfill chamber, squeeze any excess fluid into old IVPB unit
-
Remove old IVPB unit without contaminating tubing spike
-
Discard old IVPB
-
Spike new med bag aseptically
-
Hang piggyback unit back onto IV pole
-
Make sure new IVPB unit is at least 6” higher than primary fluid bag
-
Program infusion pump with new information as needed

Ensure your secondary unit is at least 6” higher than the primary fluid bag.
Section 7(b): Benefits of Back Flushing
-
Back flushing allows for one secondary set to be used for all intermittent meds
- This minimizes the need for the connection and disconnection of sets which, in turn, decreases the risk of contamination
-
One secondary set remains attached to the primary set and both are changed together at 72
-
Back flushing is a safe and cost(-)effective method for infusion
-
Not having to consistently replace new tubing will also save you valuable nursing time!
Section 8: After Programming The Infusion Pump
-
Release roller clamp
-
Visually confirm that the IVPB is successfully infusing
-
Remember to check the drip chamber of your secondary tubing!

-
-
Observe patient for signs of infiltration or an adverse reaction to medication
Section 9: After IVPB Infusion is Completed
-
Allow additional mL of primary fluid (amount typically programmed into pump) to infuse
-
Disconnect IV tubing from patient
-
Apply sterile cap to IV tubing
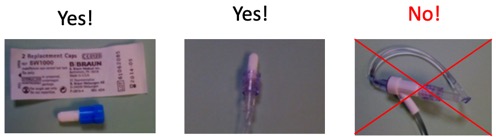
Ensure that IV tubing is properly capped after disconnection. Do not tuck the luer adapter into the injection port.
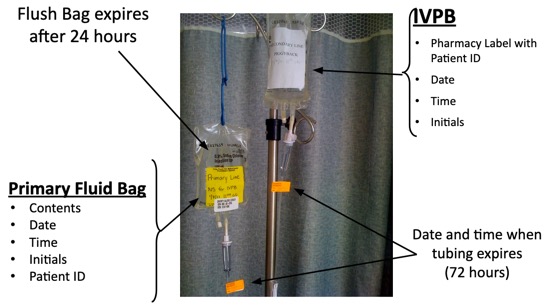
Section 10: Proper Labeling of Fluid Bags and IV Tubing
-
The primary fluid bag is labeled with: its contents, the date, the time, initials, and the patient ID
-
The IVPB is labeled with: the pharmacy label and patient ID, the date, the time, and initials
-
Tubing labels are labeled with the date and time in which the tubing expires (usually within a 72-hour timeframe)
-
Note that the flush bag also expires after 24 hours
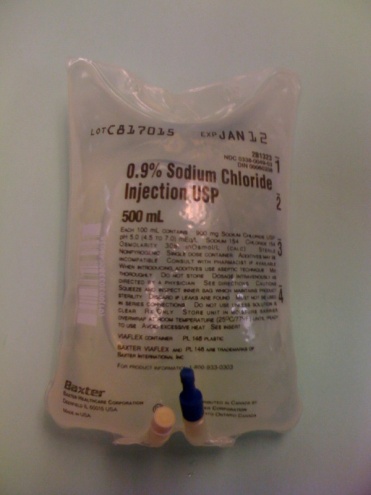
Section 11: IVPB Compatibility
-
Typical IV Fluids = 500 mL Flush Bag
-
Normal Saline (NS)
-
5% Dextrose (D5W)
-
-
Always check the compatibility of the primary solution and the IVPB
-
Some common medications with known incompatibility are:
-
Dilantin - only use NS
-
Amphotericin B - only use D5W
-
-
-
Flush bag should be the same as the diluents used to reconstitute the medication
-
Utilize compatibility charts, Pharmacists' information, and online tools such as Micromedex to confirm fluid compatibility
References
-
Alexander M., Corrigan, A., Gorski, L., Hankins, J., & Perucca, R. (Ed.). (2010). Infusion Nursing: An Evidence-Based Approach (3rd ed.). Infusion Nurses Society.
-
Camp-Sorrell, D. (Ed.). (2008). Access Device Guidelines: Recommendation for Practice and Education(2nd ed.). Oncology Nurse Society.
Course Certification Note
Once you have completed this course, click on the “Print Certificate” option at the top of this page to save or print your CE course certification (provided no further exams are required in your state or with your license). If you are not yet registered in a course plan with IvyLeagueNurse, please complete the registration and payment process so that you can log into your account and fully obtain this certificate.
Course Description
Course Objectives
Course Content
- Section 1: What is an IVPB?
- Section 2: Why Do We Want to Use an IVPB Setup?
- Section 3: Anatomy of an IVPB System
- Section 4: Equipment Needed for Setting Up an IVPB System
- Section 5: How to Start an IV Piggyback: Procedure for Hanging IVPBs
- Section 6: How to Back Prime an IV Piggyback
- Section 7: Back Flushing Diagram
- Section 7(a): Back Flushing Using the Same Secondary Tubing
- Section 7(b): Benefits of Back Flushing
- Section 8: After Programming The Infusion Pump
- Section 9: After IVPB Infusion is Completed
- Section 10: Proper Labeling of Fluid Bags and IV Tubing
- Section 11: IVPB Compatibility
- References
- Course Certification Note
Course Exam
Before you receive your certificate, you must complete the exam and achieve a score of % or higher. (You have unlimted attempts).
This exam is required by your state licensure.
Exam
Exam
We are required to delay the exam hours. Check back soon!
Exam
We are required to delay the exam until you have had time to view the course material. Please view the course first!
No Licenses on File
Please add a license to your account before you continue. Thank you!