Arterial Blood Pressure Monitoring
Arterial Blood Pressure Monitoring
Course Description
The purpose of this course is reinforcing arterial blood gas interpretation skills.
Accreditation Information: KLA Education Services LLC is accredited by the State of California Board of Registered Nursing, Provider # CEP16145.
Course Certification: Once you have completed this course, click on the “Print Certificate” option below to save or print your CE course certification. If you are not yet registered in a course plan with IvyLeagueNurse, please complete the registration and payment process so that you are able to log into your account and fully obtain your course certificate. Our affordable and unlimited one-year CEU plan starts at just $19.99.
Print Certificate Print Course
Course Objectives
Upon completion of this course, the course participant will be able to:
- Identify the following:
- The most frequent complication of invasive BP monitoring
- 3 patient conditions that require continuous blood pressure monitoring
- Necessary equipment for setting up an arterial line
- 3 steps to ensure accuracy of waveform evaluation
- Recommended patient position for zeroing of a transducer
- Identify 5 distinct components of an arterial waveform
- Steps for performing a dynamic response test (square wave test)
- 3 characteristics of an optimally damped system (normal square wave test)
- 3 characteristics of an overdamped system
- 3 characteristics of an underdamped system
- 6 nursing actions to consider while maintaining an A-line.
Course Content
Introduction
What is Arterial BP monitoring and how is it done?
- Catheter is inserted into an artery and with the use of special equipment a signal is transmitted and gives us information with regards to a patient’s cardiovascular status and tissue perfusion.
-
More accurate than non-invasive forms of BP monitoring
-
Non-invasive based only on blood flow
-
Invasive based on blood flow + SVR
-
-
Indicated when highly accurate and/or continuous BP measurements are required
-
Hemodynamically unstable
-
Severe obesity or edema
-
-
Provides direct & continuous blood pressure monitoring
-
Allows for arterial blood sampling/blood draws
Equipment
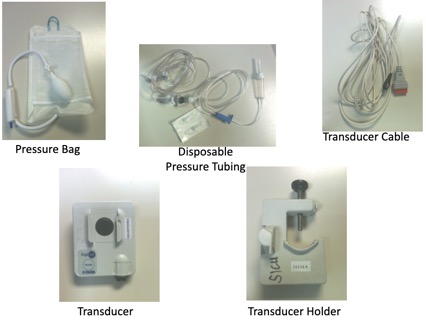
Disposable pressure tubing with dead end caps
Transducer System Setup
Dead end caps on the stopcocks
Preparing the Monitor & Tubing System
Improper systems can cause erroneous measurements of hemodynamic indices which can potentially invalidate a patient’s entire hemodynamic profile. The most frequent complication of invasive BP monitoring is equipment misuse and misinterpretation
To ensure accuracy:
- Priming of the pressure tubing
-
Leveling and zeroing
-
Dynamic response testing
Priming the Pressure Tubing
-
Use 500 mL Normal Saline
-
Check all connectors on tubing
-
Use aseptic technique to spike bag and prime entire tubing (stopcocks, luer-loks, transducer)
-
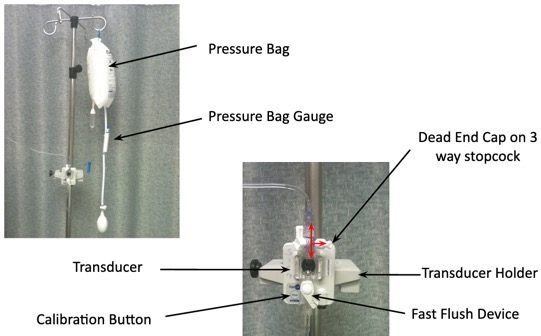
Insert IV fluid bag into pressure bag and inflate the pressure bag to 300 mmHg
-
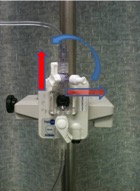
Insert transducer into the transducer holder
-
Label IV bag with date and time solution is hung + initials
-
How often does solution need to be changed? 24hours
-
- Make sure that the connectors are secure but don’t over tighten them b/c they can become stripped
- Be sure to eliminate all air bubbles as they can be a main factor in waveform distortion.
- Why insert IV fluid bag into pressure bag and inflate the pressure bag to 300 mmHg?
- Prevents air from going into the solution and catheter from clotting
- Allows 3ml/hr flush solution to be delivered through the catheter
When to Zero the Transducer
When do leveling and zeroing of the transducer need to be done?
Whenever the reference point on the patient changes the air-fluid interface changes.
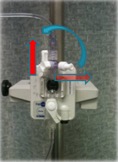
Zeroing the Transducer Reference Point
1. Place HOB from zero to 45 degrees
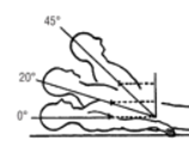
2. Position the patient and the transducer at the same level
3. Make sure the transducer is located at the phlebostatic axis
- Before invasive arterial pressure monitoring can be done, the pressure transducer needs to be placed in the appropriate position relative to the patient.
-
Zeroing electronically establishes for the monitor atmospheric pressure as the atmospheric zero reference point.
-
It establishes the interface level as the hydrostatic zero reference point.
-
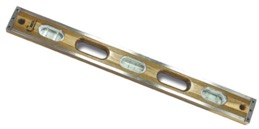
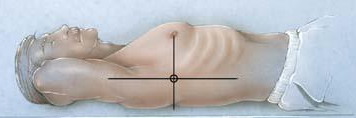
With a carpenter’s level or yard stick move the transducer up or down along the IV pole so that the transducer is located at the phlebostatic axis
-
(right atrium of the heart – 4th intercostal space, midaxillary line).
-
-
This ensures the accuracy of the readings by eliminating hydrostatic forces on the transducer.
-
If transducer is too high will have falsely low BP readings.
-
If the transducer is too low will have falsely elevated BP readings.
-
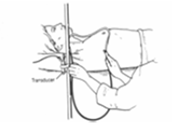
Zeroing the Transducer
-
Turn the stopcock just above the transducer off to the patient’s arterial catheter … “off to the patient”
- The patients intravascular pressures are referenced against ambient atmospheric pressures.
By opening the stopcock to air, the monitoring system uses atmospheric pressure as a reference for zero. Pressing the zero button negates the effects of atmospheric pressure so that the pressure values reflect only those of the patient.
-
Zero Balance & Calibrate the Transducer by:
-
Open stopcock on transducer to port or “air” by removing the dead end cap
-
Activate flush device
-
Press zero button on bedside monitor (will read 0/0)
-
Hold down 100mmHg calibration button to eliminate drift (will read 95-100/95-100)
-
Return stopcock back to port/monitoring position
-
Replace dead-end cap
-
Once Transduced...
-
Once transduced we should get a waveform!
-
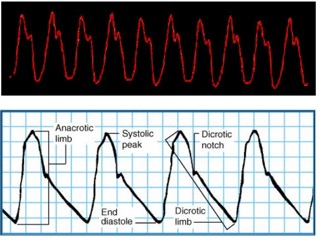
Normal arterial blood pressure produces a characteristic waveform, representing ventricular systole and diastole. The waveform has five distinct components: the anacrotic limb, systolic peak, dicrotic limb, dicrotic notch, and end diastole.
-
The anacrotic limb marks the waveform's initial upstroke, which results as blood is rapidly ejected from the ventricle through the open aortic valve into the aorta. The rapid ejection causes a sharp rise in arterial pressure, which appears as the waveform's highest point. This is called the systolic peak.
-
As blood continues into the peripheral vessels, arterial pressure falls, and the waveform begins a downward trend. This part is called the dicrotic limb.
- The closing of the aortic valve creates the dicrotic notch which marks the beginning of diastole.
Dynamic Response/Square Wave Test
Observing the waveform and performing a square wave test determines whether the system is damped

Should be performed:
-
Every 8-12 hours
-
When the system is open to air
-
When the accuracy of the reading is in question
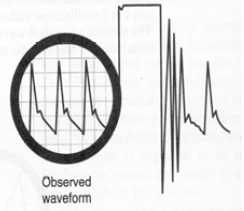
How to Perform a Square Wave Test
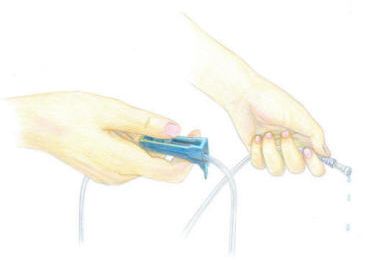
-
Hold fast flush device < 1 sec
-
Holding flush device open for less than 1 second and quickly releasing it.
-
-
Note “square wave” on the monitor
-
When the fast flush system is activated and quickly released, a sharp upstroke terminates in a flat line at the maximal indicator on the monitor which produces a “square wave”.
-
-
Square wave should be followed by an immediate rapid downstroke
-
Extends below baseline with 1-2 oscillations
-
Quick return to baseline
-
Note that waveform has all components
-
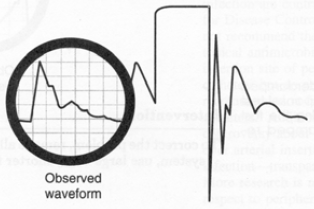
Note that the patient’s waveform has all components; anacrotic limb, dicrotic limb, dicrotic notch (Figure 3). If this is observed, no adjustment in the monitoring system is required. The system is optimally damped (Figure 4).
Square Wave Tests that Require Adjustments
Normal Square Wave Test
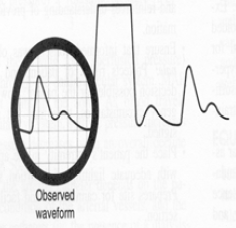
Overdamped System
Underdamped System
Images credit: Wiegand, D.L. (2011)
Overdamped System
-
Slurred upstoke
-
Waveform does not extend below baseline
-
No fast oscillation after the flush
-
Results in falsely low systolic and falsely high diastolic readings
Trouble Shooting an Overdamped System
-
Check for presence of blood clots, blood left in catheter, or air bubbles and remove
-
A large air bubble will lead to excessive signal damping and cause underestimation of the true systolic blood pressure.
-
-
Ensure all line components are securely connected
-
Ensure line is free of any kinks
Underdamped System
-
Numerous amplified oscillations
-
Results in falsely high systolic and possibly low diastolic pressures
-
A small air bubble can lower the natural resonant frequency and cause the monitoring system to resonate or ring, resulting in an elevated systolic blood pressure.
Trouble Shooting an Underdamped System
- Remove ALL air bubbles from the tubing, particularly pinpoint ones, as air bubbles are the primary cause of an underdamped waveform.
-
Check length of pressureized tubing – large bore, non-compliant, short tubing
Maintaining an A-line
-
Assess the neurovascular and peripheral vascular status of the cannulated extremity every 4 hours, or more often if warranted.
-
cap refill, sensation, movement, warmth
-
-
Assess pressure bag Q4H to ensure pressure bag device is inflated to 300mmHg and that fluid is present in the flush solution
-
Continuously observe the arterial waveform quality on the monitor and record variances to ensure the accuracy of the waveform and to detect changes in the patient's hemodynamic status. A normal waveform has a peak systole, clear dicrotic notch, and end diastole.
-
Compare the intra-arterial pressure with blood pressure readings obtained by a cuff at least once per shift or more often according to patient care setting.
-
Evaluate the patient regularly for signs or symptoms of catheter-related infection, which can include (but are not limited to) fever, chills, tachycardia, increased white blood cell count, redness or swelling at catheter insertion site.
-
Evaluate the intra-arterial pressure monitoring system regularly for air bubble formation, which can lead to potentially lethal air emboli. Remove air emboli by flushing through a system stopcock.
Blood Draw with Vacutainer
-
Verify presence of MD order for blood draw in chart.
-
Gather supplies, perform hand hygiene, and don gloves.
-
Access stopcock proximal to patient, remove dead end cap and place on sterile 4x4.
-
Place another sterile 4x4 under blood sampling port.
-
Attach vacutainer
-
Turn stopcock off to transducer
-
Attach waste test tube and fill
-
Remove waste test tube
-
Attach specimen test tube and fill
-
Remove specimen test tube
-
Turn stopcock back to monitoring position
-
Activate fast flush device to flush line
-
Turn stopcock off to patient
-
Activate fast flush to flush port
-
Turn stopcock back to monitoring position
-
Return dead end cap and observe monitor for return of waveform.
Removal of Non-sutured Arterial Catheter
-
Verify presence of MD order
-
Assess coagulation profile (PT, INR, Platelets)
-
Gather supplies (sterile 4x4 gauze and pressure dressing), perform hand hygiene, and don clean gloves.
-
Gently remove the dressing making sure to not place any tension on the arterial catheter
-
Turn the stopcock off to the flush solution
-
Apply pressure 1-2 finger widths above the insertion site.
-
Place sterile 4x4 gauze over the site while maintaining proximal pressure and immediately apply firm pressure over the insertion site as the catheter is removed
-
Apply pressure for a minimum of 5 minutes
-
Monitor for signs of bleeding or hematoma formation and evaluate the distal extremity for color, circulation, and motion:
-
Q 5 min x 30min
-
Q 30 min x 2
-
Q 1 hour x 4
-
-
Discard used supplies in appropriate receptacle and perform hand hygiene.
Documentation
-
Patient's position for zeroing the transducer
-
Patient's manual blood pressure in comparison to the blood pressure obtained through the arterial catheter
-
Assessment of arterial catheter site & presence of pulse, warmth, capillary refill, color, sensation, and motion
-
Document dressing, tubing, flush solution changes, or discontinuation of line when appropriate
Precautions/Key Points
-
Keep the arterial catheter site visible at all times. Do not allow linens to cover the site. Intra-arterial catheter dislodgement requires prompt recognition and intervention to reduce risk of exsanguination.
-
Ensure that monitor and alarms are set at appropriate limits
-
Obtain baseline data including vital signs, level of consciousness, and hemodynamic stability to help identify acute changes in the patient.
-
Compare the direct arterial pressure measurements with the indirect NBP measurement.
-
Assess arterial catheter site and check for pulse, warmth, capillary refill, color, sensation, and motion. If arterial catheter is threatening pt’s extremity, notify MD.
-
External pressure cuff surrounding the flush solution bag should be maintained at a pressure of 300mmHg (prevents air from going into solution and catheter from clotting).
-
Be aware that erroneous pressure readings may result from a catheter that is clotted or malpositioned, as well as loose connections, addition of extra stopcocks or extension tubing, inadvertent entry of air into the system, or improper calibrating, leveling, or zeroing of the monitoring system.
-
Change the pressure tubing every 72 hours or if the integrity of the system is compromised
-
Never inject anything into an arterial cannula or arterial line. Delivery of a drug into the tissues supplied by the cannulated artery can result in tissue necrosis and ischemia.
References
Imperial-Perez, F. and McRae, M. (2002). Arterial pressure monitoring. Critical Care Nurse, 22(2), 70-72.
Lippincott Williams & Wilkins (2011). Lippincott’s Nursing Procedure and Skills. Arterial pressure monitoring. Retrieved June 30, 2011 from, http://procedures.lww.com/lnp/view.do?searchQuery=Arterial%20pressure%20monitoring&pId=912702
Lippincott Williams & Wilkins (2011). Lippincott’s Nursing Procedure and Skills. Transducer system setup. Retrieved June 30, 2011 from, http://procedures.lww.com/lnp/view.do?searchQuery=Transducer%20system%20setup&pId=164403
McGhee, B.H. & Bridges, E.J. (2002). Monitoring arterial blood pressure: What you may not know. Critical Care Nurse, 22(1), 60-79.
Rauen, C.A., Makic,m.B., & Bridges, E. (2009). Evidence-based practice habits: Transforming research into bedside practice. Critical Care Nurse 29(2), 46-59.
Wiegand, D.L. (2011). Arterial catheter insertion (assist), care, and removal. AACN Procedure Manual for Critical Care (pp534-547). St. Louis, MO: Elsevier.
Course Description
Course Objectives
Course Content
- Introduction
- Equipment
- Transducer System Setup
- Preparing the Monitor & Tubing System
- Priming the Pressure Tubing
- When to Zero the Transducer
- Zeroing the Transducer Reference Point
- Zeroing the Transducer
- Once Transduced...
- Dynamic Response/Square Wave Test
- How to Perform a Square Wave Test
- Square Wave Tests that Require Adjustments
- Overdamped System
- Trouble Shooting an Overdamped System
- Underdamped System
- Trouble Shooting an Underdamped System
- Maintaining an A-line
- Blood Draw with Vacutainer
- Removal of Non-sutured Arterial Catheter
- Documentation
- Precautions/Key Points
- References
Course Exam
Before you receive your certificate, you must complete the exam and achieve a score of % or higher. (You have unlimted attempts).
This exam is required by your state licensure.
Exam
Exam
We are required to delay the exam hours. Check back soon!
Exam
We are required to delay the exam until you have had time to view the course material. Please view the course first!
No Licenses on File
Please add a license to your account before you continue. Thank you!