Central Venous Pressure
Central Venous Pressure
Course Description
This course discusses central venous pressures including equipment, procedure and maintainence of CVP setups.
Accreditation Information: KLA Education Services LLC is accredited by the State of California Board of Registered Nursing, Provider # CEP16145.
Course Certification: Once you have completed this course, click on the “Print Certificate” option below to save or print your CE course certification. If you are not yet registered in a course plan with IvyLeagueNurse, please complete the registration and payment process so that you are able to log into your account and fully obtain your course certificate. Our affordable and unlimited one-year CEU plan starts at just $19.99.
Print Certificate Print Course
Course Objectives
Upon completion of this course, the course participant will be able to:
- List 2 items that may cause an increase in CVP.
- List 2 items that may cause a decrease in CVP.
- Describe setting up a transducer.
- Describe how to zero a transducer.
- Describe the anatomy of a CVP waveform.
Course Content
Monitoring
- Central venous pressure is considered a direct measurement of the blood pressure in the right atrium and vena cava.
- CVP reflects the amount of blood returning to the heart via the venous system and the ability of the heart to pump the blood into the arterial system.
- It is acquired by threading a central venous catheter into any of several large veins. It is threaded so that the tip of the catheter rests in the lower third of the superior vena cava.
- The CVP catheter is an important tool used to assess right ventricular function and systemic fluid status.
- Normal CVP is 2-6 mm Hg.
- CVP is elevated by:
- overhydration which increases venous return
- heart failure or PA stenosis which limit venous outflow and lead to venous congestion
- positive pressure breathing, straining,
- CVP decreases with:
- hypovolemic shock from hemorrhage, fluid shift, dehydration
- negative pressure breathing which occurs when the patient demonstrates retractions or mechanical negative pressure which is sometimes used for high spinal cord injuries.
- In reality the CVP value is determined by the pressure of venous blood in the vena cava and by the function of the right heart, and it is therefore influenced not only by intravascular volume and venous return, but also by venous tone and intrathoracic pressure, along with right heart function and myocardial compliance.
- Underfilling or overdistention of the venous collecting system can be recognised by CVP measurements before clinical signs have become apparent.
Overview
-
Introduction
-
Equipment

-
Procedure
-
Maintenance
-
Precautions/Key Points
Introduction
-
Monitoring done in critical and acute care settings
-
Can be continuous or intermittent via a CVC
-
-
CVP considered equivalent to Right Atrial Pressure
-
If no tricuspid valve stenosis, also equivalent to right ventricular end diastolic volume (preload)
-
-
Reflects a patient’s
-
Cardiac function → venous return to the heart
-
Right ventricular function
-
Intravascular fluid volume status
-
-
If heart cant accept blood, it will back up into venous system
-
Will affect intravascular fluid volume status
-
-
The central venous catheter (CVC) also facilitates access to a large vessel which allows for rapid, high volume fluid administration and frequent blood draws.
How Does CVP Measurement Work?
Because no major valves lie at the cavo-atrial junction, pressures during systole and diastole reflect back to the catheter allowing for CVP measurement.
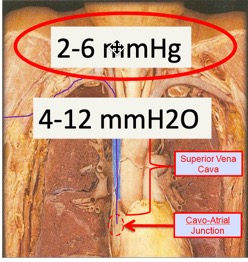
Normal CVP values range 2-6mmHg or 4-12cmH20
What Do CVP Values Mean?
-
Increase:
-
Fluid overload
-
Right heart failure
-
Cardiac tamponade
-
Pleural effusion
-
Tension pneumothorax
-
Forced exhalation
-
Mechanical ventilation
-
-
Decrease:
-
Hypovolemia
-
Shock
-
Forced inhalation
-
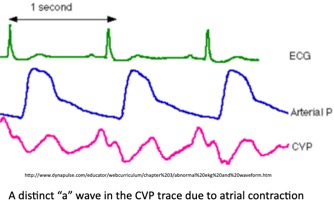
Anatomy of a CVP Waveform
Measurement of pressure back to the catheter
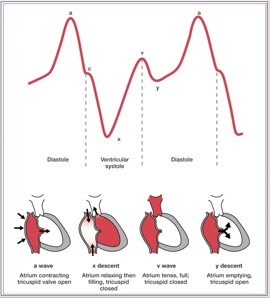
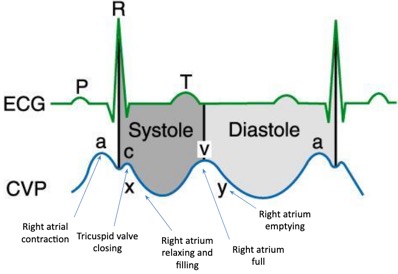
- Understanding the a, c, and v waves and how they relate to cardiac function is necessary to accurately interpret the CVP waveform.
- The a wave reflects right atrial contraction.
- + a wave : This wave is due to the increased atrial pressure during right atrial contraction. It correlates with the P wave on an EKG.
- The c wave reflects closure of the tricuspid valve.
- + c wave : This wave is caused by a slight elevation of the tricuspid valve into the right atrium during early ventricular contraction. It correlates with the end of the QRS segment on an EKG.
- The v wave reflects the right atrial filling during ventricular systole.
- + v wave : This wave arises from the pressure produced when the blood filling the right atrium comes up against a closed tricuspid valve. It occurs as the T wave is ending on an EKG.
- The CVP measurement is the mean of the a wave.
- The a wave reflects right atrial contraction.
- - x descent : This wave is probably caused by the downward movement of the ventricle during systolic contraction. It occurs before the T wave on an EKG.
- - y descent : This wave is produced by the tricuspid valve opening in diastole with blood flowing into the right ventricle. It occurs before the P wave on an EKG.
Equipment
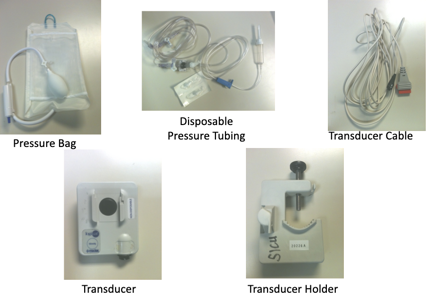
Transducer System Setup

Preparing the Monitor & Tubing System
- Improper systems can cause erroneous measurements of hemodynamic indices which can potentially invalidate a patient’s entire hemodynamic profile.
-
To ensure accuracy:
-
Priming of the pressure tubing
-
Leveling and zeroing
-
Dynamic response testing
-

- If we don’t set up our system correctly, we won’t get correct readings which can invalidate a pt’s hemodynamic profile.
- In order to ensure accuracy and minimize incorrect measurements, three procedural steps should be followed to prepare the monitoring tubing system: priming of the pressure tubing, leveling and zeroing, and dynamic response testing.
Priming the Pressure Tubing
-
Use 500 mL Normal Saline
-
Check all connectors on tubing
-
Use aseptic technique to spike bag and prime entire tubing (stopcocks, luer-locks, transducer)
-
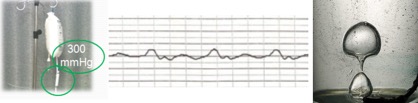
Insert IV fluid bag into pressure bag and inflate the pressure bag to 300 mmHg
-
Insert transducer into the transducer holder
-
Label IV bag with date and time solution is hung + initials
-
How often does solution need to be changed 24hours
- Check all connectors on tubing as they may be loose.
- Make sure that the connectors are secure but don’t over tighten them b/c they can become stripped.
-
Using aseptic technique, spike bag and prime entire tubing (stopcocks, luer-loks, transducer)
-
Be sure to eliminate all air bubbles as they can be a main factor in waveform blunting or overdamping.
- Insert IV fluid bag into pressure bag and inflate the pressure bag to 300 mmHg. Why?
-
Prevents air from going into the solution and catheter from clotting by allowing 3 ml/hr flush solution to be delivered through the catheter
-
- Insert transducer into the transducer holder that mounts onto the IV pole
-
Clamp CVC lumen to be used
-
Remove needleless connector
-
Scrub CVC port with alcohol swab (15 sec)
-
Connect transducer directly to CVC port
CVC Port : IV Tubing Connections
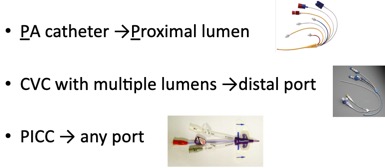
If using a pulmonary artery (PA) catheter, use the proximal lumen for continuous CVP monitoring. If using a central venous catheter (CVC) with multiple lumens, use the distal port for continuous CVP monitoring. Trace tubing and ensure that it is connected to the proper port.
Zeroing The Transducer
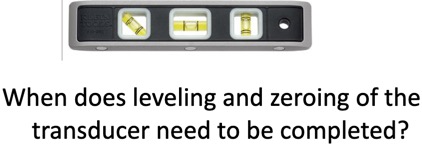
- Whenever the air-fluid interface and whenever the reference point changes
- Position change, Q shift, when accuracy of waveform reading is questionable
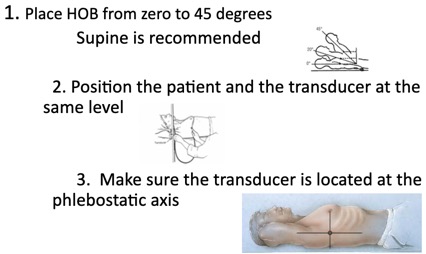
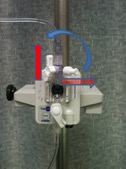
- With a carpenter’s level or yard stick move the transducer up or down along the IV pole so that the transducer is located at the phlebostatic axis (right atrium of the heart – 4th intercostal space, midaxillary line).
- This ensures the accuracy of the readings by eliminating hydrostatic forces on the transducer.
- If transducer is too high will have falsely low BP readings.
- If the transducer is too low will have falsely elevated BP readings.
- Turn the stopcock just above the transducer off to the patient’s arterial catheter … “off to the patient”
-
Zero Balance & Calibrate the Transducer by:
-
Open stopcock on transducer to port or “air”
-
Remove dead-end cap
-
Activate flush device
-
Press zero button on bedside monitor (will read 0)
-
Hold down 100mmHg calibration button to eliminate drift (will read 100)
-
Return stopcock back to port/monitoring position
-
Replace dead-end cap
-
Once Transduced...
Maintaining a CVP Line
-
Assess flush system every 4 hours to ensure pressure bag is inflated to 300mmHg and that fluid is present in flush solution.
-
Evaluate the patient regularly for signs or symptoms of catheter-related infection.
-
can include (but are not limited to) fever, chills, tachycardia, increased white blood cell count, redness or swelling at catheter insertion site, and positive blood cultures
-
-
Evaluate pressure monitoring system regularly for air bubble formation and remove if present.
-
Continuously observe the CVP waveform quality on the monitor and record variances to ensure the accuracy of the waveform and to detect changes in the patient's hemodynamic status. A normal CVP waveform has a, c, and v waves.
-
Evaluate the intra-arterial pressure monitoring system regularly for air bubble formation, which can lead to potentially lethal air emboli. Remove air emboli by flushing through a system stopcock.
Precautions and Key Points
-
Monitor alarms set at appropriate limits
-
Obtain baseline data including vital signs, level of consciousness, and hemodynamic stability to help identify acute changes in the patient.
-
Ensure that pt is still while CVP reading is being taken – measure at end expiration
-
If CVP fluctuates by more than 2mm Hg suspect change in clinical status and report
-
If using a pulmonary artery (PA) catheter, use the proximal lumen for continuous CVP monitoring. If using a central venous catheter (CVC) with multiple lumens, use the distal port for continuous CVP monitoring. Trace tubing and ensure that it is connected to the proper port.
- Ensure that the patient is still while the CVP reading is being taken to prevent artifact.
-
Read the CVP value by measuring the mean of the a wave at end expiration.
- Understanding the a, c, and v waves and how they relate to cardiac function is necessary to accurately interpret the CVP waveform. The a wave reflects right atrial contraction. The c wave reflects closure of the tricuspid valve. The v wave reflects the right atrial filling during ventricular systole. The CVP measurement is the mean of the a wave.
-
Transparent dressings should be changed every 7 days and PRN
-
Assess catheter necessity daily
- Complications of CVP monitoring include sepsis, thrombus, vessel puncture, and air embolism.
Documentation
-
Document the patient's position for zeroing the transducer so that other health care team members can replicate the placement.
-
Document the patient’s CVP readings, interventions, outcomes, and if the physician was notified.
-
Document dressing, tubing, flush solution changes, or discontinuation of line when appropriate.
References
Lippincott Williams & Wilkins (2011). Lippincott’s Nursing Procedure and Skills. Central venous pressure monitoring, transducer. Retrieved July 24, 2011 from, http://procedures.lww.com/lnp/view.do?searchQuery=Arterial%20pressure%20monitoring&pId=912702
Lippincott Williams & Wilkins (2011). Lippincott’s Nursing Procedure and Skills. Transducer system setup. Retrieved June 30, 2011 from, http: http://procedures.lww.com/lnp/view.do?searchQuery=Transducer%20system%20setup&pId=164403
Pittman, J. A.L., Ping, J.S., Mark, J.B (2006). Arterial and central venous pressure monitoring. Anesthesiology Clin, 24(4), 717-35.
Rauen, C.A., Makic,m.B., & Bridges, E. (2009). Evidence-based practice habits: Transforming research into bedside practice. Critical Care Nurse 29(2), 46-59.
Course Description
Course Objectives
Course Content
- Monitoring
- Overview
- Introduction
- How Does CVP Measurement Work?
- What Do CVP Values Mean?
- Anatomy of a CVP Waveform
- Equipment
- Transducer System Setup
- Preparing the Monitor & Tubing System
- Priming the Pressure Tubing
- CVC Port : IV Tubing Connections
- Zeroing The Transducer
- Once Transduced...
- Maintaining a CVP Line
- Precautions and Key Points
- Documentation
- References
Course Exam
Before you receive your certificate, you must complete the exam and achieve a score of % or higher. (You have unlimted attempts).
This exam is required by your state licensure.
Exam
Exam
We are required to delay the exam hours. Check back soon!
Exam
We are required to delay the exam until you have had time to view the course material. Please view the course first!
No Licenses on File
Please add a license to your account before you continue. Thank you!